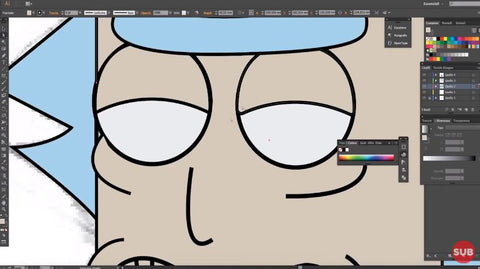
rick and morty style drawing
Rick and Morty drawing
Rick and Morty (2013) has been so popular during these years that, today, lots of people wish to learn how to draw or to get personalized cartoons with this style. Here, you will learn the basic things to know, little by little to draw like a professional.
You will get the best Rick and Morty style cartoon in both pencil drawing and digitally, with apps such as Illustrator or Photoshop.
Rick and Morty yourself with pencil
Sketching with pencil is in fact a valuable kind of art, as you are practicing and putting effort on it, you will be able to master it easily and, little by little, gaining experience and different techniques to have a great quality drawing, even to the point of creating and drawing more and new characters.
How to draw a cartoon of Rick
To illustrate a cartoon of the iconic Rick, let's follow these steps:
Start with the eyes: First, you should start drawing his eyes. Make two round circles, not too apart from each other. Then, make a dot inside these. Put them in the place where you want the character to look at. You can also add dark circles or bags under his eyes by just making two curved lines behind the circles.
The nose: once you get the eyes, the following step is to draw his nose. Basically, make a curve very similar to the letter "U". Do it below the eyes, in the middle space left between them.
The mouth: to draw his mouth, you just simply should make a line, either straight or slightly curved. We recommend you that this line is as long as the length of both eyes together. (Check out the picture below).
The last detail to end up this part is to draw some expression to his mouth. The best you can do is to draw a letter "C" and one "C" backwards, on each side of these lines.
Finish the face: what is left to do is the eyebrows. In this case, draw it with a shape similar to a thin banana right above the eyes. Make it with a length similar to the length of both eyes together.
Once you get the eyebrows, start joining the lines from the point of the eyebrow to the eyes, from the eyes to the expression of his mouth and then make an oval circle surrounding all the drawn figures.

To draw Rick's ears, draw from the level of the bags of his eyes to the line of expression of his mouth. It is not that complicated, but be careful in doing the ears too big or small.
Finally, draw his pointy hair starting with one little triangle at the level of his neck, and then a bunch of bigger triangles surrounding his face- 12 triangles in total - Be careful with the size of them.

Rick's body: Finish your drawing by making a simple sketch of the body of Rick. Once you get more experience and master this, you can add more details such as the clothing or different backgrounds from the series.

Need more help? Check out this YouTube video for more ideas and details for your drawing.
Rick and Morty yourself in Illustrator or Photoshop
If you want to draw your Rick and Morty cartoon digitally, follow these steps:
First of all, we recommend that, in order to make cartoons of this type and digitally, you better use apps to edit such as Photoshop or Illustrator. Of course, there are plenty of other apps and tools. But these are the ones with the best results at the end, as well as being the most easy to manage due to their popularity.
Step 1
Start making a quick and simple sketch, taking into account the design and shape of the cartoon. Imagine or use a guide to draw Rick's face: round eyes, a "U" shaped nose, thin lips, small ears and a long eyebrow. Then, add some details, such as the bags under his eyes or expressions in his mouth.
We do not go into detail with this, we think and you may also think this is something really easy to do.

Step 2
It does not matter at first how good or bad your sketch was. As you are practicing more, you will improve. In this step, correct those defects or mistakes you may find as you are perfecting your strokes. -Check if some lines are bigger or longer than others, make perfectly round circles, etc.-
How can I do that? Easy, with the pen tool of Illustrator or Photoshop. No matter what, you must be patient at first while doing this and of course check out your draw pulse.

Step 3
You get your drawing, great. Now, what is left to do? Exactly, let's paint it. Be creative and add as many details as you want. Add shadows on character's faces, hair and even clothes.

Draw me Rick and Morty Style: other alternatives
If you do not want to draw and save all the troubles, there are many other options. For example, hiring the services of a professional designer .
Turn your photo into Rick and Morty
There are pages in which the only thing you must do is upload the picture to cartoonize and specify some details for the designer to make a better job. After carrying out the payment, your cartoon will start to be drawn. In only a few days you will receive it to your email and you can use it for whatever you want: to print for a poster, in your mug, a portrait or anything you wish.
If you want to check out rates and designs to turn yourself into a Rick and Morty character (click here)
rick and morty style drawing
Source: https://getcartoonizer.com/blogs/news/how-to-draw-rick-and-morty-style-step-by-step
Posted by: littletonhiming62.blogspot.com

0 Response to "rick and morty style drawing"
Post a Comment