

How To Create A Distribution List In Office 365 Outlook
Create a contact group or distribution list in Outlook for PC
Outlook for Microsoft 365 Outlook 2021 Outlook 2019 Outlook 2016 Outlook 2013 Outlook 2010 Outlook 2007 Office for business More...Less
Use a contact group (formerly called a "distribution list") to send an email to multiple people—a project team, a committee, or even just a group of friends—without having to add each name to the To, Cc, or Bcc line individually.
For information about contact groups in for Mac, see Create a contact group in Outlook for Mac.
-
On the Navigation bar, click People.
Note:You can find People in one of two places on the Navigation bar.
If you're using the compact Navigation bar, click the People icon.

If you're using the expanded Navigation bar, click the word People.

-
Under My Contacts, select the folder where you want to save the contact group. Usually, you'll select Contacts.
-
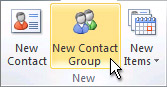
On the Ribbon, select New Contact Group.
-
Give your contact group a name.
-
Click Add Members, and then add people from your address book or contacts list.

Note:To add someone who is not in your address book or contacts, select New E-mail Contact.
-
Click Save & Close.
To learn how to use your new contact group, see Send an email message to a contact group.
If you're always emailing the same group of people, you can create a contact group (previously called a distribution list) that includes all of the recipients by using a previous email that you sent to them. Then, the next time you want to contact them or schedule a meeting with them, you can add the contact group to the To line of your message, instead of adding each person individually.
-
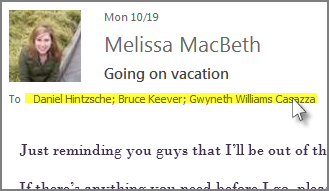
Open an email that was sent to the people you want to include in the contact group.
-
In the To or Cc box, highlight all the names with your mouse.
-
Right-click your selection, and then click Copy, or press Ctrl+C.
-
In the main Outlook window (not in the opened email message), click People on the Navigation bar

-
Click New Contact Group.

-
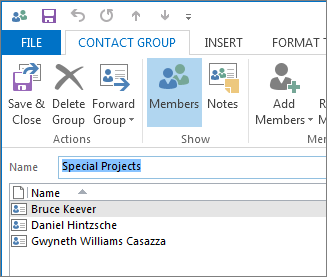
Type a name for your contact group, like Special Projects.
-
Click Add Members > From Outlook Contacts.

-
In the window that opens, right-click inside the Members box, and click Paste, or press Ctrl+V.
-
Click OK.
The people from the email will appear as a list of members for your contact group.
-
Click Save & Close.
Contact groups show up in your list of contacts, along with individual people. You can tell the difference by the icons that appear to the left of the names in List view. The card icon is for individual contacts and the people icon is for contact groups.

Finally, you can always add people or remove people from the contact group later.
If you have a lot of business or personal contacts that you keep in an Excel spreadsheet, you can import them straight into Outlook.
Then you can create a contact group (formerly called a "distribution list") using the imported contact information.
Unfortunately, you can't import a list of contacts from Excel directly into a distribution list, but you can import the contacts into your Contacts folder, then use the instructions above to create a distribution list from those contacts.
For information about importing contacts from Excel, see Import contacts to Outlook.
See also
Add people to a contact group
Change what appears on the Navigation Bar
Important: Office 2010 is no longer supported. Upgrade to Microsoft 365 to work anywhere from any device and continue to receive support.
Upgrade now
Create a contact group
-
Create a contact group with new names or add names from the Address Book
-
In Contacts, on the Home tab, in the New group, click New Contact Group.
-
In the Name box, type a name for the contact group.
-
On the Contact Group tab, in the Members group, click Add Members, and then click From Outlook Contacts, From Address Book or New Email Contact.
-
If you are adding a new email contact, enter the information for the person in the Add New Member dialog box.
If you are adding a member from Outlook Contacts or an Address Book, do the following:
-
In the Address Book drop-down list, click the address book that contains the email addresses that you want to include in your contact group.
-
In the list of names, click the names that you want, and then click Members. You can add names from different address books to the same contact group.
-
-
Do this for each person whom you want to add to the contact group, and then click OK.
The contact group is saved in your Contacts folder under the name that you give it.
-
-
Create a contact group by copying names from an email message
-
In the message that you want to copy the names from, click the names in the To or Cc box.
-
Right-click your selection, and then click Copy.
-
In Mail, on the Home tab, in the New group, click New Items, then click More Items, and then click Contact Group.
-
In the Name box, type a name for the contact group.
-
On the Contact Group tab, in the Members group, click Add Members, and then click either From Outlook Contacts or From Address Book.
-
At the bottom of the Select Members dialog box, in the Members box, right-click, and then click Paste.
-
Note:A member doesn't have to be in your Address Book to be added to the contact group. The member's name and email address are included when you copy and paste from the original email message.
When you receive a message that includes a contact group that you want to use, you can save it to your Contacts.
-
Open the message that contains the contact group.
-
In the To or Cc box, right-click the contact group, and then click Add to Outlook Contacts.
See also
Share a contacts folder with others
Important: Office 2007 is no longer supported. Upgrade to Microsoft 365 to work anywhere from any device and continue to receive support.
Upgrade now
Create a distribution list
Distribution lists are stored by default in your Contacts folder. If you use a Microsoft Exchange account, your Global Address List can contain global distribution lists, which are available to everyone who uses that network. The personal distribution lists that you create in your Contacts folder are available only to you, but you can share them by sending them to others.
How many names can I include in a distribution list?
| The maximum number of names that you can include in a distribution list depends on the size of the contact files (for each contact) themselves. There are no hard and fast rules but in general, a distribution list can contain between 50-70 names and e-mail addresses. A maximum number of e-mail addresses, with minimum contact file size, is approximately 125, and this can include other distribution lists. For more information see the Knowledge Base article on the maximum size for distribution lists. |
Do one of the following:
-
Create a distribution list by using names in the Address Book
-
On the File menu, point to New, and then click Distribution List.
-
In the Name box, type the name of your distribution list. (For example, "Political Friends.")
-
On the Distribution List tab, click Select Members.
-
In the Address Book drop-down list, click the address book that contains the e-mail addresses you want to include in your distribution list.
-
In the Search box, type a name that you want to include. When the name you're searching for appears in the list below, click it, and then click Members.
-
Do this for each person whom you want to add to the distribution list, and then click OK.
If you want to add a longer description of the distribution list, on the Distribution List tab, click Notes, and then type the text.
The distribution list is saved in your Contacts folder under the name that you give it.
-
-
Create a distribution list by copying names from an e-mail message
-
In the message that you want to copy the names from, select the names in the To or Cc box.
-
Right-click your selection, and then click Copy on the shortcut menu.
-
Click the Microsoft Office Button
 , and under Create New Outlook Item, click Distribution list.
 -
On the Distribution List tab, in the Members group, click Select Members.
-
At the bottom of the Select Members dialog box, in the Members box, right-click and then click Paste on the shortcut menu.
Note:A member does not need to be in your Address Book in order to be added to the distribution list. The member's name and e-mail address will be included when you copy and paste from the original e-mail message.
-
Click OK.
-
In the Name box, type a name for the distribution list.
-
On the Distribution List tab, in the Actions group, click Save & Close.
-
Distribution lists are stored by default in your Contacts folder. When you receive a distribution list from someone else, you can save it to your Contacts.
-
Open the message that contains the distribution list.
-
In the header of the message, right-click the distribution list, and then click Add to Outlook Contacts on the shortcut menu.
Need more help?
How To Create A Distribution List In Office 365 Outlook
Source: https://support.microsoft.com/en-us/office/create-a-contact-group-or-distribution-list-in-outlook-for-pc-88ff6c60-0a1d-4b54-8c9d-9e1a71bc3023
Posted by: littletonhiming62.blogspot.com
0 Response to "How To Create A Distribution List In Office 365 Outlook"
Post a Comment